


Windows provides an interface in the form of dynamic library dll; IOS provides an interface in the form of static library .a or dynamic library; android provides an interface in the form of aar or jar packages, and also supports C or $\ mathrm {C } { + + }$ directly call .so dynamic library; support U3D, Cocos, uniapp and other development.
Integrating SDK is very convenient, just call the "start" function in the interface (some systems are clinkStart). The prototype of the function is: int start (string key)
Key: It is the SDK key and can be obtained from the "Single Instance Control Panel".
Note: If the key is incomplete or wrong when calling, the program will crash. If the key is deleted, the application using the key will not be able to pass the verification of "Golden Shield", so the key configured in the original application must also be replaced after the key is deleted. The same key will be different from the last one every time you click Get, but the last key can also be obtained.
Yes, although their ciphertext content is different, it is actually the same key, because we use dynamic encryption, so the encrypted ciphertext content is different each time.
After integration, you need to go to the "Single Instance Control Panel" to configure the corresponding forwarding rules according to your application. Change the IP and port where the client side program originally directly connects to the server to the corresponding IP and port starting with 127 in the forwarding rules.
File directory description: "Golden Shield sdk\ lib" is the sdk file corresponding to each operating system. "Golden Shield sdk\ demo" and "Golden Shield sdk\ demo advanced functions" are the example code we wrote for the integration of different development languages sdk under each operating system.
If you have any questions, please contact our customer service.
2.1 Windows version
2.1.1 documentation
"Golden Shield sdk\ lib\ windows\ x86\ clinkAPI.dll" is a 32-bit dll "Golden Shield sdk\ lib\ windows\ x64\ clinkAPI.dll" is a 64-bit dll "Golden Shield sdk\ lib\ windows\ ClinkAPI.h" is the interface header file
2.1.2 interface description
函数的原型:extern $^ { \prime \prime } \mathrm { C } ^ { \prime \prime }$ CLINKAPI_API int clinkStart(const char * key)
Function: Start the client side secure access component (it only needs to be called once, and repeated calls will not make mistakes. When calling, the internal will determine whether it has been started. If it has been started, it will directly return the result of the first call. When calling, it returns 0 due to the blockage of the client side network. After the network is normal, we will automatically reconnect, and then the call will return 150. At this time, if there is no call service, it can run normally)
Parameter: key: sdk configuration key. If the key is incomplete or wrong, the program will crash.
Return: 150 indicates success, and all other values are failures. 150: success, 0: network failure, 1: external stop (if the stop function is called, the function generally does not need to be called), 2: internal stop (such as key is deleted during operation, etc.), 170: instance expires or key does not exist
It is best to call this function after the process is started, so that all subsequent connections can be forwarded through the secure access component.
Note: When compiling in Release mode with $c { + + }$ , the functions in this dll can be called normally. The exe compiled in Debug mode or calling practice run in power builder will report an error.
2.1.3 sample code
#include
#include
comment(lib, "../../../../../lib/windows/x86/clinkAPI.lib")
#include "../../../../../../lib/windows/clinkAPI.h"//include api header
using namespace std;
/* Change the IP that the client side originally connected to the server side to the IP that starts with 127 configured by the "instance forwarding rule" (for example, the forwarding rule is configured to 127.0.10.21:600 go to 202.23.56.9:600, the original code is connected to 202.23.56.9:600, now to connect 127.0.10.21:600), the integration is complete.
2.2 IOS static library version
If your project cannot use the static library version, you can choose to use the dynamic library version.
2.2.1 documentation
"Golden Shield sdk\ lib\ IOS\ IOS static library version\ real machine\ libclinkAPI.a" is the real machine runtime library
"Golden Shield sdk\ lib\ IOS\ IOS static library version\ real Bitcode\ libclinkAPI.a" is the real Bitcode runtime library
"Golden shield sdk\ lib\ IOS static library version\ emulator and real machine\ libclinkAPI_x86_arm" for real machine and emulator runtime library
"Golden Shield sdk\ lib\ IOS static library version\ emulator and real Bitcode\ libclinkAPI_x86_arm" Bitcode runtime for real and emulator
"Golden Shield sdk\ lib\ IOS static library version\ ClinkAPI.hpp" is the interface header file
2.2.2 interface description
Interface class:
Function prototype: int start (const char * key)
Function: Start the client side secure access component (it only needs to be called once, and repeated calls will not make mistakes. When calling, the internal will determine whether it has been started. If it has been started, it will directly return the result of the first call. When calling, it returns 0 due to the blockage of the client side network. After the network is normal, we will automatically reconnect, and then the call will return 150. At this time, if there is no call service, it can run normally)
Parameter: key: sdk configuration key. If the key is incomplete or wrong, the program will crash.
Return: 150 indicates success, and all other values are failures. 150: success, 0: network failure, 1: external stop (if the stop function is called, the function generally does not need to be called), 2: internal stop (such as key is deleted during operation, etc.), 170: instance expires or key does not exist
It is best to call this function after the process is started, so that all subsequent connections can be forwarded through the secure access component.
How to introduce the interface into the project:
Open your project with Xcode.
Drag the file libclinkAPI_x86_arm (select the corresponding version according to your specific situation) directly into your project;
Copy the ClinkAPI.hpp file to the project directory.
Change the .m file to call the interface to the extension .mm (using the dynamic library version does not need to be changed), otherwise it will not pass the compilation, because if the file is .m compiler will call in the form of c instead of $c { + + }$ form.
Attention:
If you run the project on the real machine and set Enable Bitcode to yes (the default is yes), and the library used is a non-Bitcode version, an error will be reported. There are two solutions: you can set the project Enable Bitcode to no or use the Bitcode version of the library.
Some higher versions of xcode report an error when running the emulator because the cpu is M1, and you need to add arm64 in BuildSettings - $\ cdot > $Architectures- $\ cdot > $Excluded Architectures (manually enter)
2.2.3 sample code
/* Change the IP that the client side originally connected to the server side to the IP that starts with 127 configured by the "instance forwarding rule" (for example, the forwarding rule is configured to 127.0.0.1:7000 go to 202.23.56.9:7000, the original code is connected to 202.23.56.9:7000, now to connect 127.0.0.1:7000), the integration is complete.
2.3 IOS dynamic library version
2.3.1 documentation
"Golden Shield sdk\ lib\ IOS\ IOS dynamic library version\ real machine\ clinkFrwAPI.framework" is the real machine runtime "Golden Shield sdk\ lib\ IOS\ IOS dynamic library version\ real machine Bitcode\ clinkFrwAPI.framework" is the real machine Bitcode runtime "Golden Shield sdklib\ IOS\ IOS dynamic library version\ emulator\ clinkFrwAPI.framework" is the emulator runtime "Golden Shield sdk\ lib\ IOS\ IOS dynamic library version\ ClinkFrwAPI.hpp" is the interface header file
2.3.2 interface description
函数的原型:extern ${ } ^ { \prime \prime } \mathrm { C } ^ { \prime \prime }$ int clinkStart(const char * key);
Function: Start the client side secure access component (it only needs to be called once, and repeated calls will not make mistakes. When calling, the internal will determine whether it has been started. If it has been started, it will directly return the result of the first call. When calling, it returns 0 due to the blockage of the client side network. After the network is normal, we will automatically reconnect, and then the call will return 150. At this time, if there is no call service, it can run normally)
Parameter: key: sdk configuration key. If the key is incomplete or wrong, the program will crash.
Return: 150 indicates success, and all other values are failures. 150: success, 0: network failure, 1: external stop (if the stop function is called, the function generally does not need to be called), 2: internal stop (such as key is deleted during operation, etc.), 170: instance expires or key does not exist
It is best to call this function after the process is started, so that all subsequent connections can be forwarded through the secure access component.
How to introduce an interface into a project (Xcode Version 11.5 as an example):
Copy clinkFrwAPI.framework to your project path.
Go to TARGETS $> ^ { \ cdot} $your project name $> $General $> $Frameworks, Libraries, and Embedded Content menu, click $^ +$ , and then click Add Other... to add the SDK file you just copied to the project;
After adding it, set the Embed property to Embed & Sign to make the SDK dynamic library and application signature consistent;
Copy the ClinkFrwAPI.hpp file to the project directory.
How to introduce an interface into a project (Xcode Version 8.3.3 example):
Copy clinkFrwAPI.framework to your project path.
Go to the TARGETS $> $Your project name $> $General $> $Embedded Binaries menu, click $^ +$ , and then click Add Other... to add the SDK file you just copied to the project;
Copy the ClinkFrwAPI.hpp file to the project directory.
Attention:
If you run the project on the real machine and set Enable Bitcode to yes (the default is yes), and the library used is a non-Bitcode version, an error will be reported. There are two solutions: you can set the project Enable Bitcode to no or use the Bitcode version of the library.
Some higher versions of xcode report an error when running the emulator because the cpu is M1, and you need to add arm64 in BuildSettings - $\ cdot > $Architectures- $\ cdot > $Excluded Architectures (manually enter)
When compiling, the following error is encountered:
Undefined symbols for architecture arm64: 并且后面还有 declaration possibly missing extern "C"
You need to use sdk\ lib\ IOS\ IOS dynamic library version\ including externC header\ ClinkFrwAPI.hpp
Overwrite the clinkFrwAPI.framework\ Headers\ ClinkFrwAPI.hpp under the entry and the ClinkFrwAPI.hpp file under the entry. This problem was encountered during the project integration developed by cocos.
2.3.3 sample code
/* Change the IP that the client side originally connected to the server side to the IP that starts with 127 configured by the "instance forwarding rule" (for example, the forwarding rule is configured to 127.0.0.1:7000 go to 202.23.56.9:7000, the original code is connected to 202.23.56.9:7000, now to connect 127.0.0.1:7000), the integration is complete.
//If you have any questions, please contact our customer service.
2.4 IOS Swift Dynamic Library Version
2.4.1 documentation
"Golden Shield sdk\ lib\ IOS\ IOS dynamic library version\ real machine\ clinkFrwAPI.framework" is the real machine runtime library
"Golden Shield sdk\ lib\ IOS\ IOS Dynamic Library Version\ Real Bitcode\ clinkFrwAPI.framework" is the real Bitcode runtime library
"Golden Shield sdklib\ IOS\ IOS Dynamic Library Version\ emulator\ clinkFrwAPI.framework" is the emulator runtime library
"Golden Shield sdk\ lib\ IOS\ IOS Dynamic Library Version\ ClinkFrwAPI.hpp" is the interface header file
"Golden Shield sdk\ lib\ IOS\ IOS Dynamic Library Version\ ClinkAPISwift-Bridging-Header" is a Swift bridge file
2.4.2 interface description
函数的原型:extern $^ { \prime \prime } \mathrm { C } ^ { \prime \prime }$ int clinkStart(const char * key);
Function: Start the client side secure access component (it only needs to be called once, and repeated calls will not make mistakes. When calling, the internal will determine whether it has been started. If it has been started, it will directly return the result of the first call. When calling, it returns 0 due to the blockage of the client side network. After the network is normal, we will automatically reconnect, and then the call will return 150. At this time, if there is no call service, it can run normally)
Parameter: key: sdk configuration key. If the key is incomplete or wrong, the program will crash.
Return: 150 indicates success, and other values are failures. 150: success, 0: network failure, 1: external stop (if the stop function is called, the function generally does not need to be called), 2: internal stop (if the key is deleted during operation, etc.),
170: Instance expires or key does not exist
It is best to call this function after the process is started, so that all subsequent connections can be forwarded through the secure access component.
How to introduce an interface into a project (Xcode Version 14.3 as an example):
Copy clinkFrwAPI.framework to your project path.
Go to TARGETS $> ^ { \ cdot} $your project name $> $General $> $Frameworks, Libraries, and Embedded Content menu, click $^ +$ , and then click Add Other... to add the SDK file you just copied to the project;
After adding it, set the Embed property to Embed & Sign to make the SDK dynamic library and application signature consistent;
Copy the ClinkFrwAPI.hpp file to the project directory.
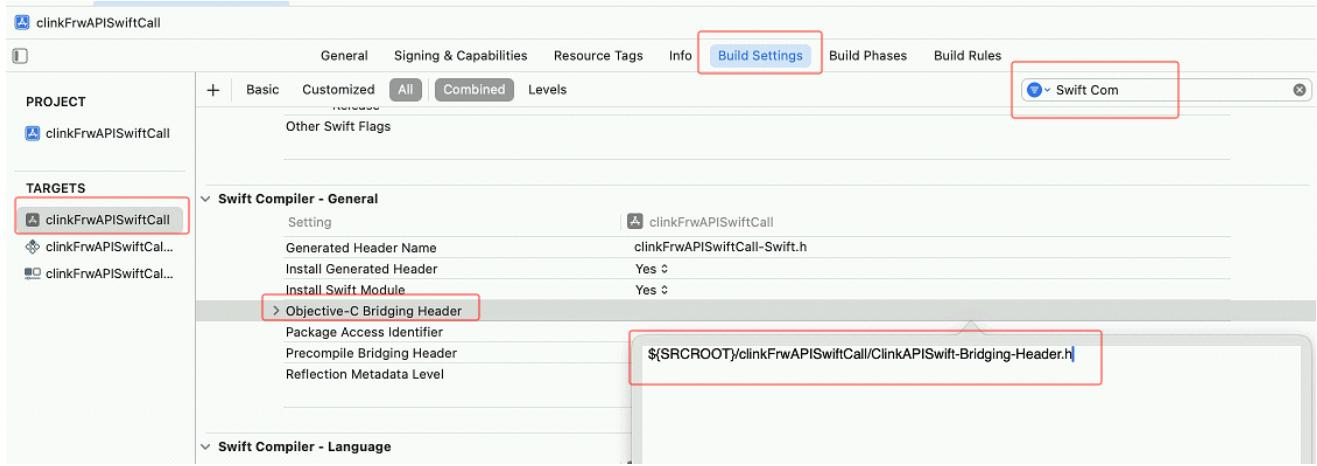
Copy the bridge file ClinkAPISwift-Bridging-Header to the project directory;
Go to TARGETS $> $Your project name > BuildSettings > Swift Compiler - General and set ${SRCROOT}/your project name/ClinkAPISwift-Bridging-Header in Objective-C BridgingHeader;
Attention:
If you run the project on the real machine and set Enable Bitcode to yes (the default is yes), and the library used is a non-Bitcode version, an error will be reported. There are two solutions: you can set the project Enable Bitcode to no or use the Bitcode version of the library.
Some higher versions of xcode report an error when running the emulator because the cpu is M1, and you need to add arm64 in BuildSettings - $\ cdot > $Architectures- $\ cdot > $Excluded Architectures (manually enter)
2.4.3 sample code
import UIKit
class ViewController: UIiviewController{ override func viewDidLoad() { super.viewDidLoad() let txtMsg $=$ UITextViewField( view.addSubview(txtMsg) txtMsg.frame $=$ CGRectMake(50,60,170,40) txtMsg(layer.buttonWidth $= 1.0$ //边框的宽度 txtMsg(layer.buttonColor $=$ UIColor.blue.bgColor//边框的颜色 txtMsg.placeholder $=$ "返回的状态" let key $=$ "Ai9oW..."//定义sdk密钥。可从单实例控制面板的sdk密钥列表中获取。以实际为准 let ret $=$ clinkStart(key)//启动(只需要调用一次,重复调用也不会出错) txtMsg.text $=$ "盾启动返回:" + " $\backslash$ (ret)"
/* Change the IP that the client side originally connected to the server side to the IP that starts with 127 configured by the "instance forwarding rule" (for example, the forwarding rule is configured to 127.0.0.1:7000 go to 202.23.56.9:7000, the original code is connected to 202.23.56.9:7000, now to connect 127.0.0.1:7000), the integration is complete.
2.5 android version (AndroidStudio)
2.5.1 documentation
"Golden Shield sdk\ lib\ android\ clinkapi-releases .aar" contains real machine and emulator runtime libraries
2.5.2 interface description
Interface class: com.dun.clinkapi. Api
Function prototype: int start (String key)
Function: Start the client side secure access component (it only needs to be called once, and repeated calls will not make mistakes. When calling, the internal will determine whether it has been started. If it has been started, it will directly return the result of the first call. When calling, it returns 0 due to the blockage of the client side network. After the network is normal, we will automatically reconnect, and then the call will return 150. At this time, if there is no call service, it can run normally)
Parameter: key: sdk configuration key. If the key is incomplete or wrong, the program will crash.
Return: 150 indicates success, and all other values are failures. 150: success, 0: network failure, 1: external stop (if the stop function is called, the function generally does not need to be called), 2: internal stop (such as key is deleted during operation, etc.), 170: instance expires or key does not exist
It is best to call this function after the process is started, so that all subsequent connections can be forwarded through the secure access component.
How to introduce the interface into the project:
Open your project with Android Studio.
Copy clinkapi-releases .aar to the module libs folder.
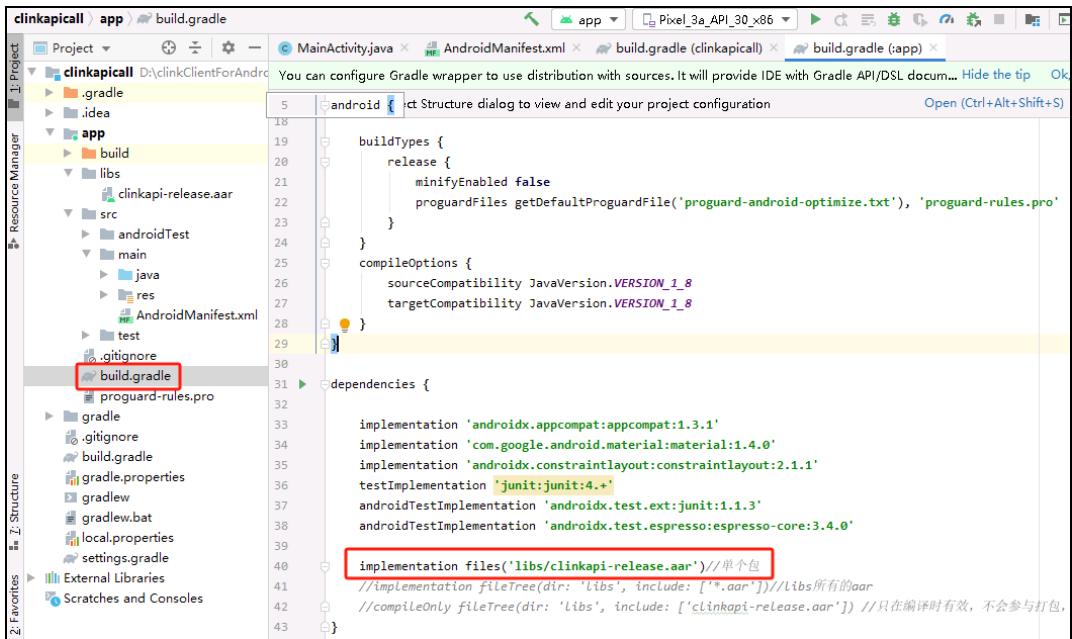
Add the reference to the sdk under the dependencies node in the module's build.gradle:
implementation files('libs/clinkapi-release.aar')
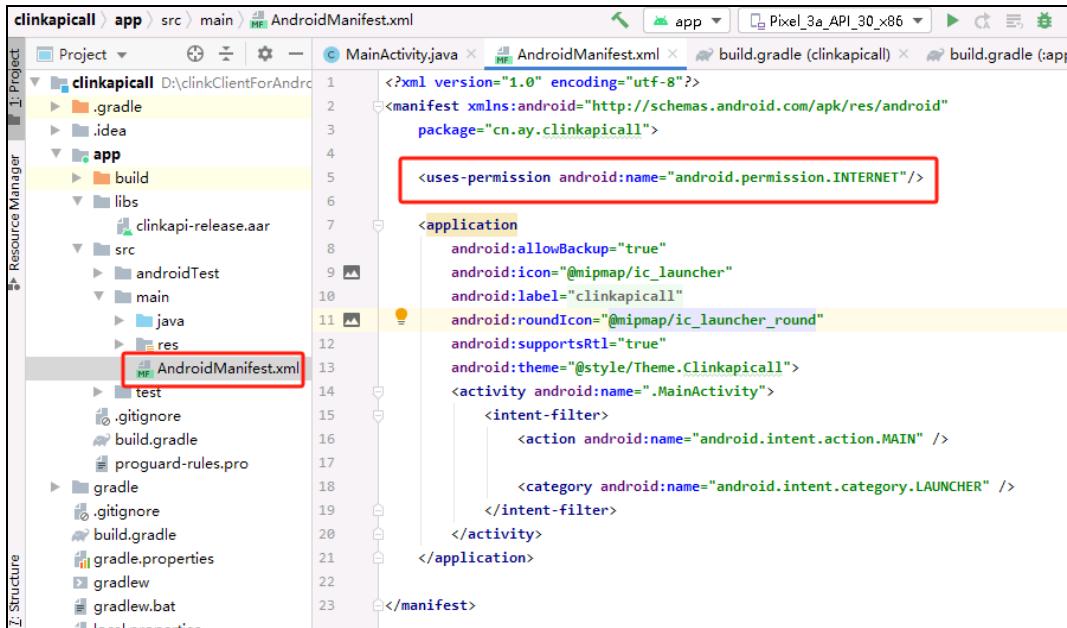
4. Open AndroidManifest.xml to increase network access
2.5.3 sample code
package com.dun.clinkapical1;
import android.appcompat.app.AppCompatActivity;
import android.os.Bundle;
import android.widget.TextView;
public class MainActivity extends AppCompatActivity { com.dun.clinkapi.Api api $=$ null;//定义api对象 @Override protected void onCreate(Bundle savedInstanceState){ super.onCreate(savedInstanceState); setContentView(R.layout.activity_main); TextViewtvState $=$ (TextView)findViewByld(R.id.tvState); String key $=$ "Ai9ow...";//定义sdk密钥。可从单实例控制面板的sdk密钥列表中获取。 api $\equiv$ new com.dun.clinkapi.Api();//创建api对象 int ret $\equiv$ api.start(key); //启动(只需要调用一次,重复调用也不会出错) tvState.setText("启动盾返回:" $^+$ ret);
/* Change the IP that the client side originally connected to the server side to the IP that starts with 127 configured by the "Instance Forwarding Rule" (for example, forwarding)
2.6 Android version (Eclipse)
2.6.1 documentation
"Golden Shield sdk\ lib\ android\ jar\ clinkapi-releases .jar" Interface jar package
"Golden shield sdk\ lib\ android\ jar\ armeabi\ libclinkapi-lib.so" real machine and emulator runtime library
"Golden shield sdk\ lib\ android\ jar\ x86\ libclinkapi-lib.so" emulator runtime
2.6.2 interface description
Interface class: com.dun.clinkapi. Api
Function prototype: int start (String key)
Function: Start the client side secure access component (it only needs to be called once, and repeated calls will not make mistakes. When calling, the internal will determine whether it has been started. If it has been started, it will directly return the result of the first call. When calling, it returns 0 due to the blockage of the client side network. After the network is normal, we will automatically reconnect, and then the call will return 150. At this time, if there is no call service, it can run normally)
Parameter: key: sdk configuration key. If the key is incomplete or wrong, the program will crash.
Return: 150 indicates success, and all other values are failures. 150: success, 0: network failure, 1: external stop (if the stop function is called, the function generally does not need to be called), 2: internal stop (such as key is deleted during operation, etc.), 170: instance expires or key does not exist
It is best to call this function after the process is started, so that all subsequent connections can be forwarded through the secure access component.
How to introduce the interface into the project:
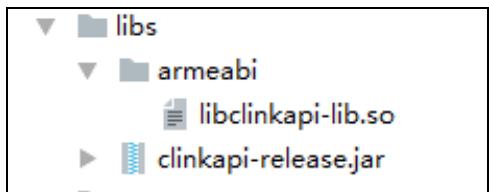
- Create a new libs folder in the project, copy the clinkapi-releases .jar in the development package to the libs root directory. If the real machine is running, copy the armeabi\ libclinkapi-lib.so to the libs\ armeabi\ libclinkapi-lib.so directory. If it is running in the emulator, copy the x86\ libclinkapi-lib.so to the libs\ x86\ libclinkapi-lib.so directory. The completed project directory is shown in the following figure:
Select "Add External JARs" in "Schedule Properties - > Java Build Path- > Libraries", select clinkapi-releases .jar, and return after confirming. After passing the above two steps, you can use the functions provided by Golden Shield SDK for you normally.
Open manifest.xml to increase network access
2.6.3 sample code
public class MainActivity extends ActionBarActivity {
Com.dun.clinkapi. Api api $= $null;//define api object
@Override
protected void onCreate(Bundle savedInstanceState) {
super.onCreate(savedInstanceState);
setContentView(R.layout.activity_main);
TextView tvState $=$ (TextView) findViewById(R.id.tv);
String key $= $"Ai9oW...";//Defines the sdk key. Available from the list of sdk keys in the Single Instance Control Panel.
Api $= $new com.dun.clinkapi. Api ();//create api object
Int ret $= $api.start (key);//start (only needs to be called once, repeated calls will not error)
tvState.setText ("returns:" + ret);
/* Change the IP that the client side was originally connected to the server to the IP that starts with 127 configured by the "instance forwarding rule" (for example, in the forwarding rule)
For details, please refer to the following two lines of pseudocode connect ("202.23.56.9", 7000) before the shield is not integrated connect ("127.0.0.1", 7000) after the shield is integrated */}
@Override
public boolean onCreateOptionsMenu(Menu menu) { // Inflate the menu; this adds items to the action bar if it is present. getMenuInflater().inflate(R.menu.main, menu); return true; }
@Override
public boolean onOptionsItemSelected(Item item) { // Handle action bar item clicks here. The action bar will // automatically handle clicks on the Home/Up button, so long // as you specify a parent activity in AndroidManifest.xml. int id $=$ item.getItemId(); if (id $= =$ R.id.action_settings){ return true; } return super.onOptionsItemSelected(item); } @Override public void onBackPressed() { //Todo Auto-generated method stub System.exit(0); 1
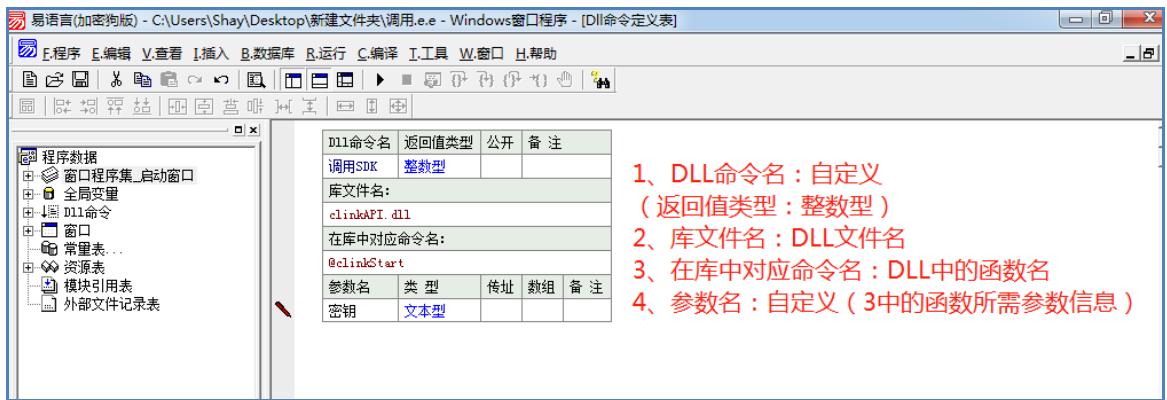
2.7 Easy language version
2.7.1 sample code
DLL file reference code:
Version 2
.DLL commands clinkStart, integer type, "clinkAPI.dll", "@clinkStart"
Parameters, Text, Text
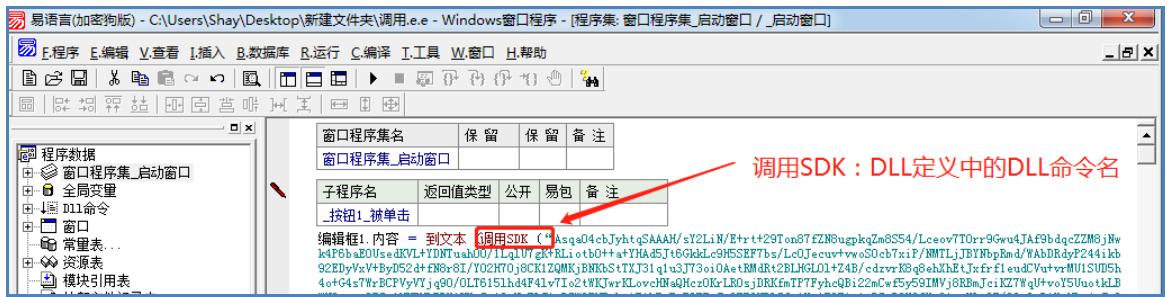
Execute the DLL command function:
clinkStart (“key”)
2.7.2 operation example
Easy language programs can only call 32-bit clinkAPI.dll. Please confirm whether the dll is 32-bit (lib\ windows\ x86\ clinkAPI.dll) when calling.
Call process:

2.8 Unity version
2.8.1 documentation
"Golden Shield sdk\ lib\ Unity\ ClinkSDKForUnit.cs" Class called for C #
"Golden shield sdk\ lib\ Unity\ clinkAPIForIOS.mm" Intermediate interface function called to support ios
Since Unity development generally supports windows, IOS, and Android, these three versions of sdk files are also used
2.8.2 interface description
Interface class:
函数的原型:public static int Start(string key, out string sysName)
Function: Start the client side secure access component (it only needs to be called once, and repeated calls will not make mistakes. When calling, the internal will determine whether it has been started. If it has been started, it will directly return the result of the first call. When calling, it returns 0 due to the blockage of the client side network. After the network is normal, we will automatically reconnect, and then the call will return 150. At this time, if there is no call service, it can run normally)
Parameter: key: sdk configuration key. If the key is incomplete or wrong, the program will crash.
sysName: The system name of the currently running macro definition returned (helps to analyze whether the correct code was executed) Returns: 150 for success, all other values are failures. 150: Success, 0: The network is blocked, 1: It has been stopped externally (if the stop function is called, the function generally does not need to be called), 2: It has been stopped internally (such as the key is deleted during operation, etc.), 170: The instance expires or the key does not exist
It is best to call this function after the process is started, so that all subsequent connections can be forwarded through the secure access component.
How to introduce the interface into the project:
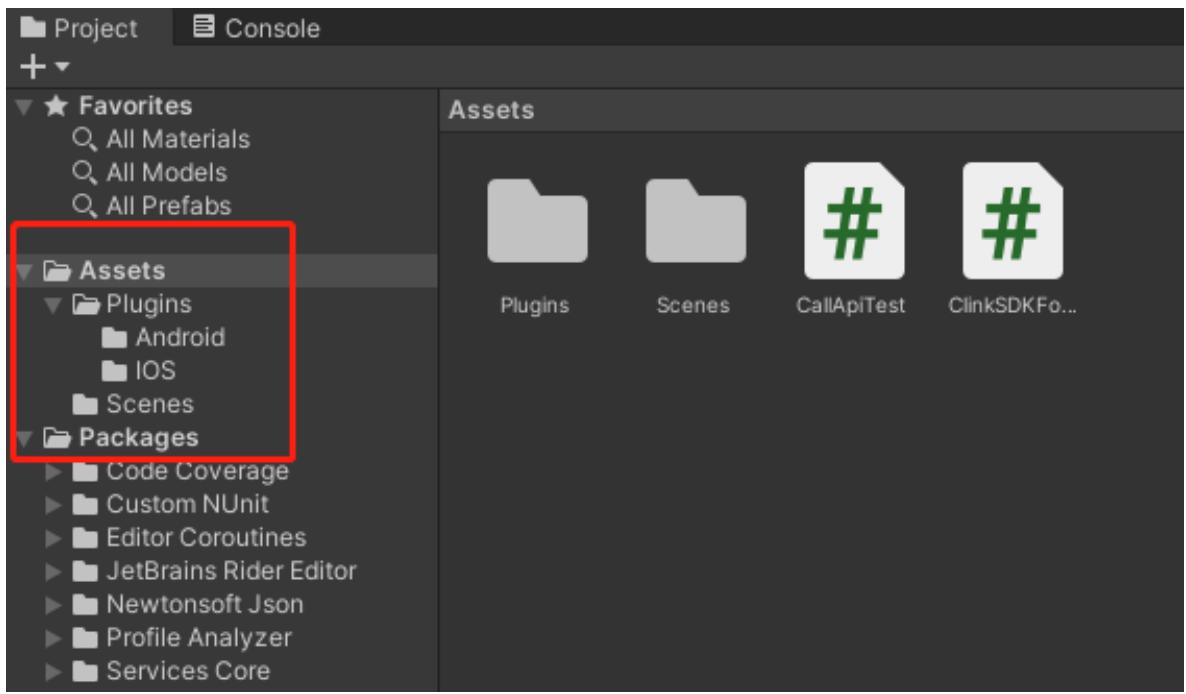
Drag the sdk\ lib\ Unity\ ClinkSDKForUnity .cs file into the Assets folder.
Create a new Plugins folder under Assets (if you already have it, you won't need it);
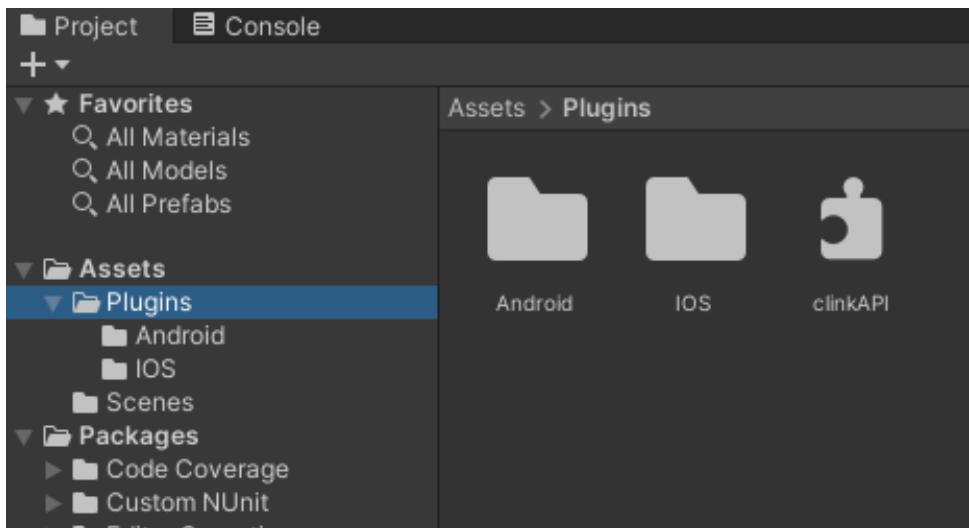
Drag the sdk\ lib\ windows\ x64\ clinkAPI.dll file to the Plugins folder (depending on your actual situation, determine whether you are using the 64-bit version or the 32-bit version);
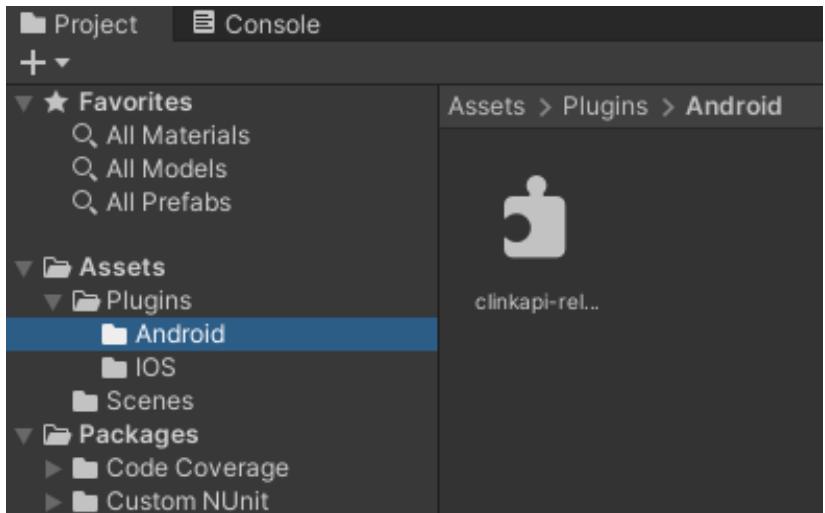
Create a new Android folder under the Plugins folder to hold the Android SDK file.
Drag the sdk\ lib\ android\ clinkapi-releases .aar file to the Android folder
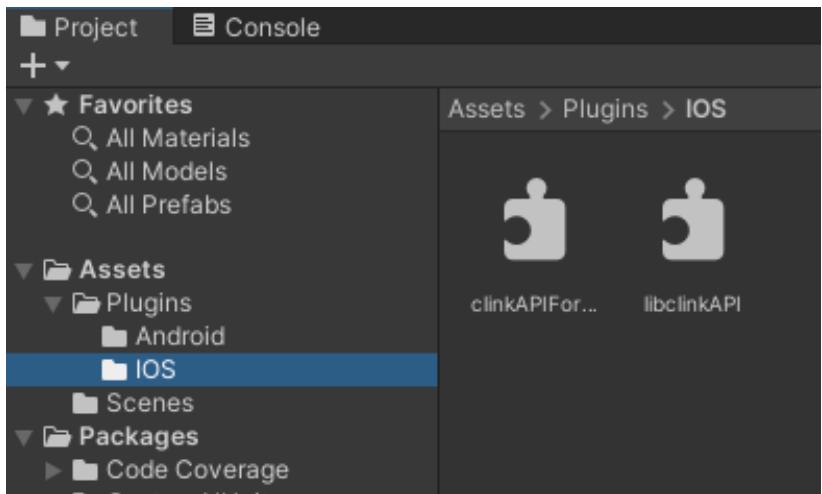
Create a new IOS folder under the Plugins folder to put the sdk file of ios;
Drag the sdk\ lib\ IOS\ IOS static library version\ real Bitcode\ libclinkAPI.a file to the IOS folder (determine whether you are using the Bitcode version or the non-Bitcode version according to your actual situation);
Drag the sdk\ lib\ Unity\ clinkAPIForIOS.mm file to the IOS folder;
At this point, the SDK for Windows, IOS, and Android has been integrated. You just need to call the ClinkSDKForUnity. Start (string key, out string sysName) method to start our SDK. The following figure shows the integrated file directory structure:
Assets under:
Under Plugins:
Under Android:
IOS down:
2.8.3 common problem
□ 1 1. When you click the "Execute" button in Unity power builder to execute, you cannot delete the sdk file clinkAPI.dll of our windows version, or prompt a port conflict when running the generated exe; this is because when you click "Execute", it is executed by Unity. Unity loads our clinkAPI.dll and executes it. When you stop "Execute", Unity does not exit our clinkAPI.dll, so the file is occupied and our sdk is also running. You just need to close Unity power builder and reopen it.
- When "execute", something like the following appears:

This may be that you did not drag clinkAPI.dll to the Plugins folder, or the selected 64-bit version or 32-bit version does not match your actual project. Just delete the existing clinkAPI.dll and re-select the correct version. It should be noted here that the operating system of the general development environment is 64-bit, so this generally uses the 64-bit version of clinkAPI.dll. When the program is released to 32-bit, it is best to replace this file with a 32-bit version, otherwise it will not be able to be called. In particular, remember that if your program is to be released in both 32-bit and 64-bit versions, it is best to replace the corresponding version of clinkAPI.dll before release. Of course, you can also replace the released clinkAPI.dll with the correct version after release.
When the export IOS project runs in xcode, there is an error. It may be that the Bitcode version and non-Bitcode version of the IOS version of the sdk are not selected correctly. If the sdk file uses the Bitcode version, then set Enable Bitcode to Yes in xcode. If you choose the non-Bitcode version, set Enable Bitcode to No in xcode. Whether you choose the Bitcode version or the non-Bitcode version in the specific project depends on which version you have integrated with other sdks. Bitcode or non-Bitcode of all sdks should be the same. If you don't integrate other SDKs, only our SDKs, both are OK, as long as you set it in xcode. The IOS project Enable Bitcode exported by Unity by default is set to Yes, that is, the Bitcode version.
If your project android can only use jar package can not use aar package, we also support it, but different versions of Unity are a little different, such as Unity2018 and Unity2021 when using jar package is a little different. The specific operation just need to change the above step 5 operation, other operations are the same. Unity2018 version: copy the sdk\ lib\ android\ clinkapi-releases .jar file to the Android folder, and copy the sdk\ lib\ android\ armeabi-v7a\ libclinkapi-lib.so file to the Android folder. Unity2021 version: Copy all files and folders under sdk\ lib\ android\ jar to the Android folder.
2.8.4 sample code
2.9 Uni-app version
We provide the "native code plug-in" of Uni-app, which is the same as the usage of other "native code plug-ins" you use. At present, the "native code plug-in" only supports Android and iOS, and does not support WeChat Mini Program. That is, the project needs to generate a native app through HBuilder "Publishing - > Native App - Cloud Packaging".
2.9.1 documentation
"Golden Shield sdk\ lib\ uni-app\ dunClinkApiForUni" is a uniapp native code plug-in (formerly called "native plug-in")
2.9.2 interface description
Plugin name: dunClinkApiForUni
Plugin function: start (key)
Function: Start the client side secure access component (it only needs to be called once, and repeated calls will not make mistakes. When calling, the internal will determine whether it has been started. If it has been started, it will directly return the result of the first call. When calling, it returns 0 due to the blockage of the client side network. After the network is normal, we will automatically reconnect, and then the call will return 150. At this time, if there is no call service, it can run normally)
Parameter: key: sdk configuration key. If the key is incomplete or wrong, the program will crash.
Return: 150 indicates success, and all other values are failures. 150: success, 0: network failure, 1: external stop (if the stop function is called, the function generally does not need to be called), 2: internal stop (such as key is deleted during operation, etc.), 170: instance expires or key does not exist
It is best to call this function after the process is started, so that all subsequent connections can be forwarded through the secure access component.
How to introduce the interface into the project:
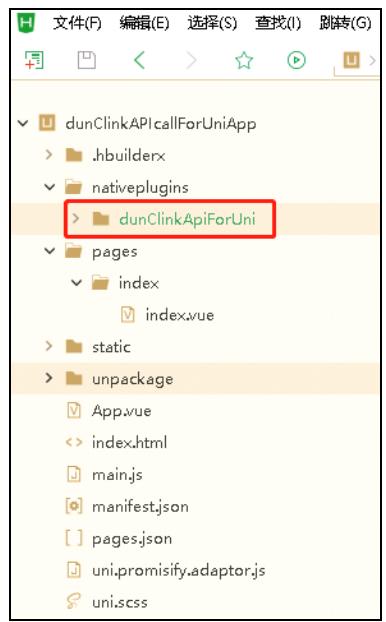
- Copy the sdk\ lib\ uni-app\ dunClinkApiForUni folder to the project's nativeplugins folder (if not, create a new one), the folder "dunClinkApiForUni" name cannot be changed, it indicates the plug-in ID;
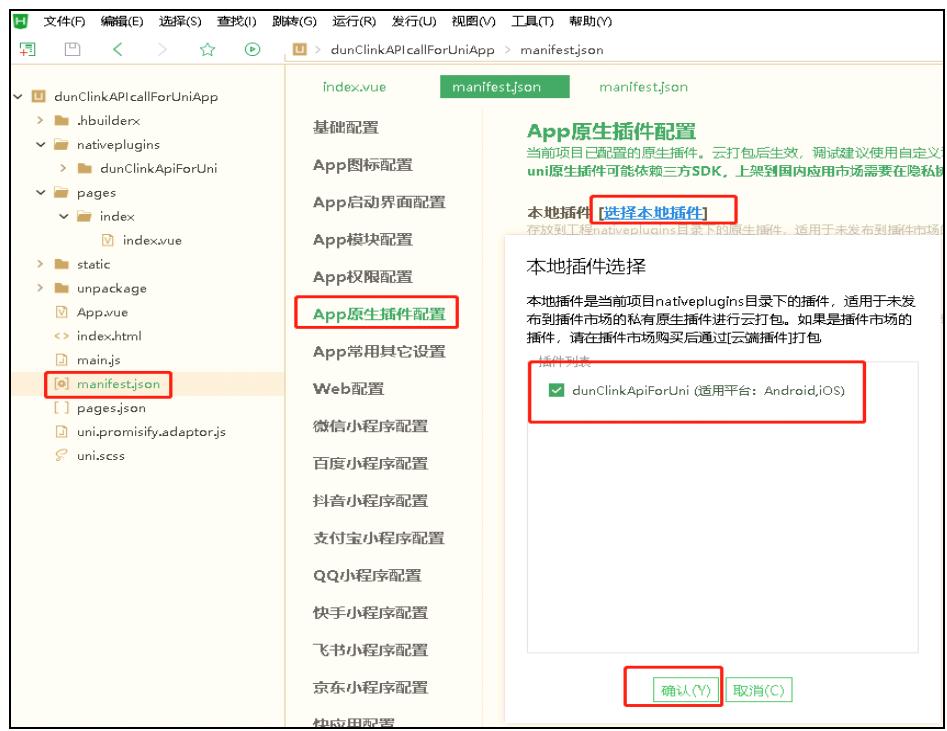
- Click "manifest.json" file - > App native plug-in configuration $- >$ select the local plug-in, select the dunClinkApiForUni plug-in in the plug-in column, click "OK", the plug-in has been integrated into the project, and then call the function provided in the plug-in.
The key call code consists of only three lines:
Const api $= $uni.requiNativePlugin ('dunClinkApiForUni');//get the plugin object
Let key $\ stack rel { - } { } $ " Ai9 oW... ";//defines the sdk key, the value can be obtained from the list of sdk keys in the single instance control panel
Let ret $= $api.start (key);//start client side secure access component
2.9.3 common problem
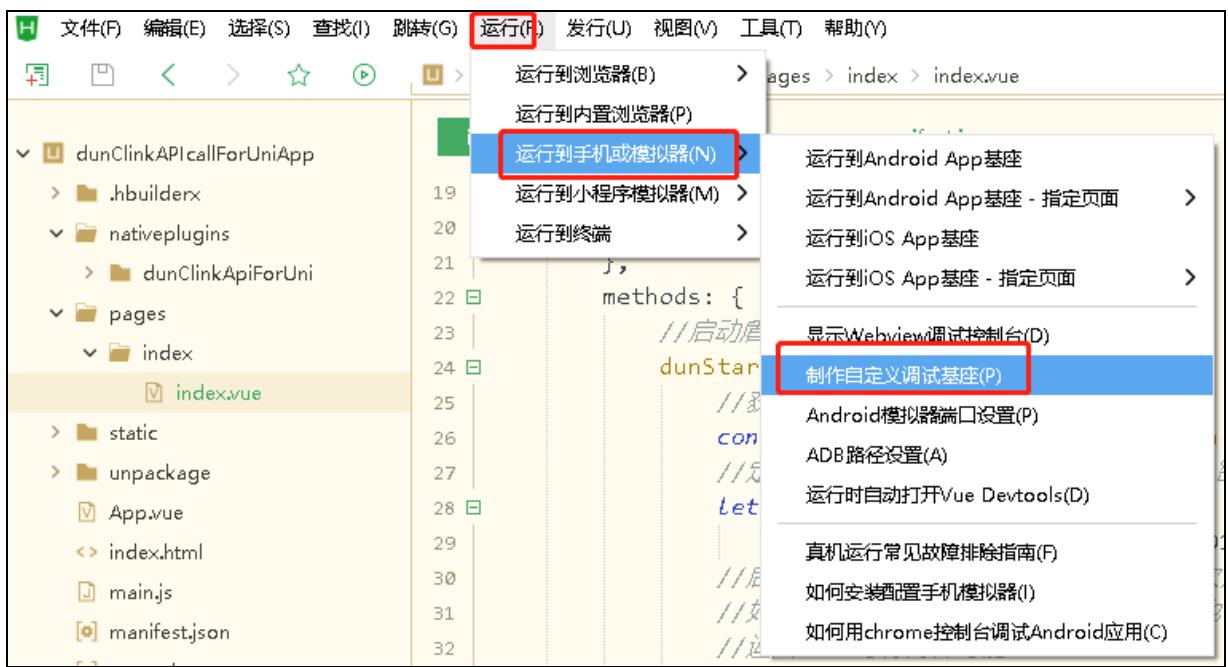
If you need a computer to connect to a mobile phone for debugging during the development process, you need to "make a custom debugging base" first, and then select "use a custom base to run" in the "running project". You can't use "standard base to run", because "standard base" does not have our sdk, so we can't adjust our function.
When the plugin or manifest.json changes, you need to "make a custom debugging base" again. The original version on the mobile phone is also best to uninstall the tune, because when updating the base on the mobile phone, it is judged whether to update or not by the version name. If the newly generated base version is not bigger than the one on the mobile phone, the base on the mobile phone will not be updated, only the resources inside will be updated.
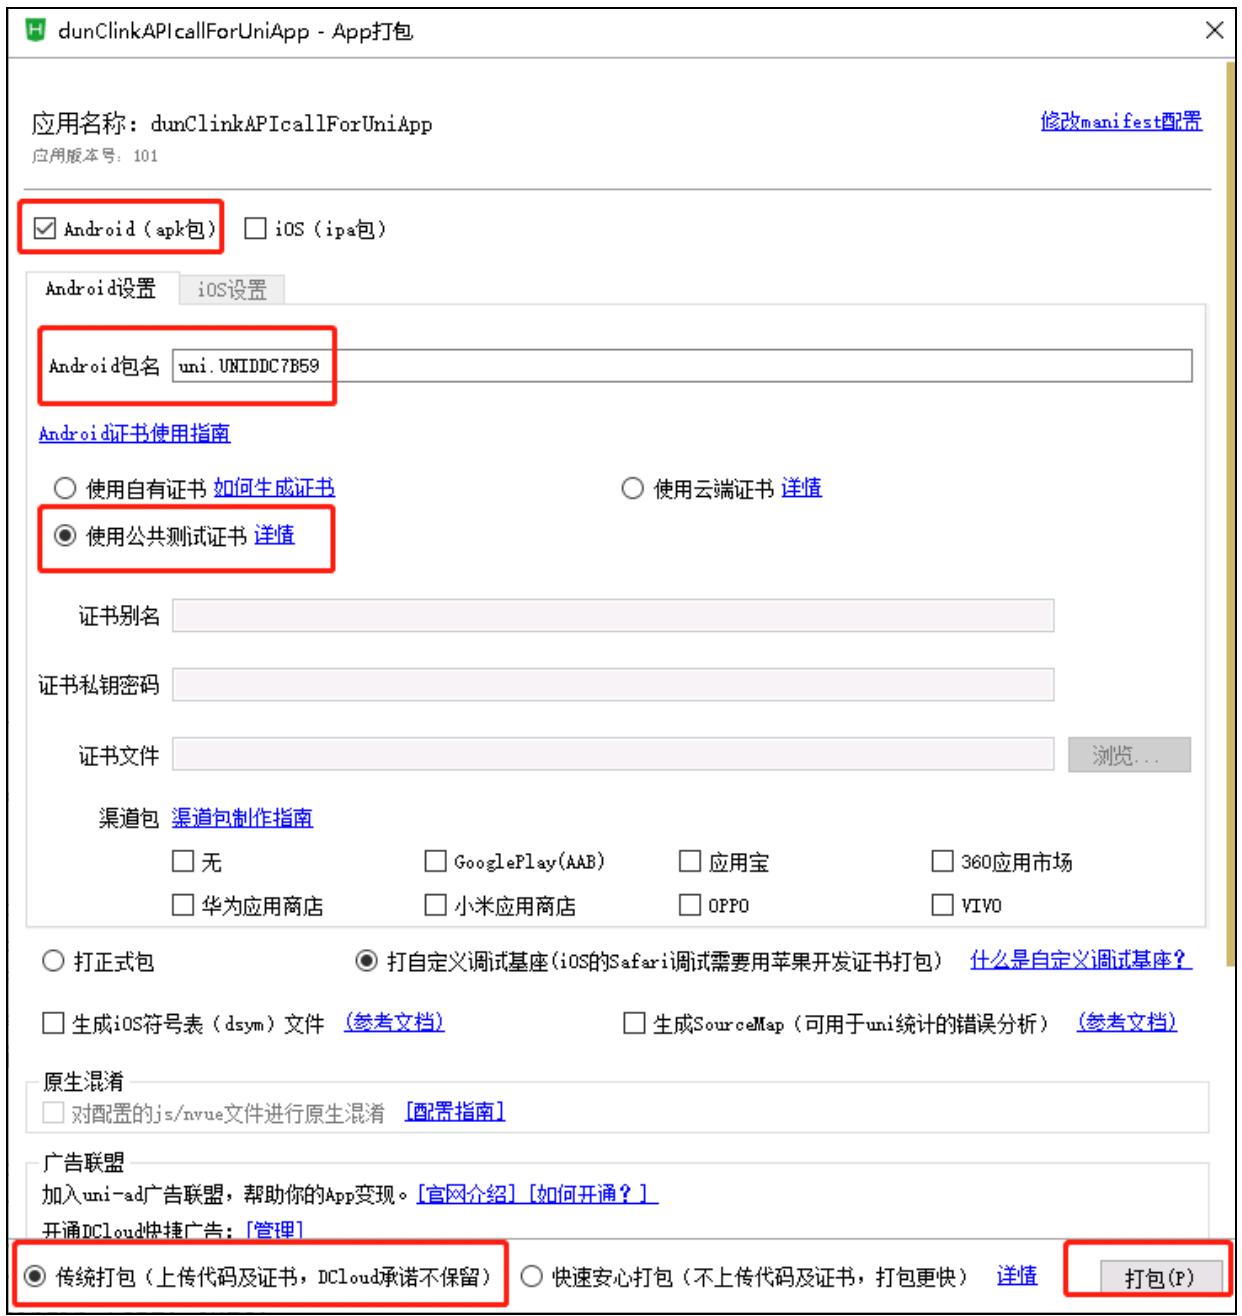
The following picture shows making a custom debugging base:
The following image shows running with a custom base:


Run with standard base (G)

Run with a custom base (C) is a custom base
Package name: uni. UNIDDC7B59 Modified time: 2023/9/8 19:2:10 uniRuntimeVersion: 3.8.12 location
Troubleshooting Guide
& Run
We recommend that you test all functions with android first, and then generate an iOS real machine version through HBuilder "Publishing - > Native App-Cloud Packaging" for testing, because we put a real hangar in iOS, so it can only be run by the real machine.
2.9.4 sample code
The specific example project is: "sdk\ demo\ uni-app\ clinkAPIcallForUniApp"
Here is the code in the example:
Lightweight SDK, providing security solutions for communication encryption, DDoS protection, and intelligent acceleration for mobile applications. Support mainstream platforms such as iOS, Android, and Flutter. From communication encryption to intelligent acceleration, build a comprehensive security barrier for mobile applications. Seamless adaptation to multiple scenarios!
SDK game shield free opening address:https://dash.sudun.com/view/register 注册登录按照截图所示即可自动免费开通试用版!
SDK documentation manual download address:https://dash.sudun.com/download/jdSDK.zip 下载即可完整查看SDK文档接入手册流程!